2017년 1월 25일 수요일

자마린 스튜디오(Xamarin)을 사용한 웹뷰 컨트롤 제어 코드입니다.

맥에서 C#으로 아이폰용앱, 안드로이드용 앱을 만드는 것은 꿈만 같은 일입니다. ^^

맥에서 자마린 스튜디오로 자마린폼기반으로 프로젝트를 생성합니다. 아래와 같이 재물 코드를 코딩합니다.

<?xml version="1.0" encoding="UTF-8"?>
<ContentPage xmlns="http://xamarin.com/schemas/2014/forms" 
 xmlns:x="http://schemas.microsoft.com/winfx/2009/xaml" 
x:Class="DemoDataBinding.DemoWebView">


<ContentPage.Padding>    
<OnPlatform x:TypeArguments="Thickness"        
  iOS="10, 20, 10, 0"        Android="10, 0"        WinPhone="10, 0" />    
</ContentPage.Padding>


<StackLayout>        
<Entry Keyboard="Url"            Placeholder="web address"            
Completed="OnEntryCompleted" />        
  <StackLayout Orientation="Horizontal"            
  BindingContext="{x:Reference webView}">            
<Button Text="&#x21D0;"                FontSize="Large"                
HorizontalOptions="FillAndExpand"                
IsEnabled="{Binding CanGoBack}"                Clicked="OnGoBackClicked" />            
<Button Text="&#x21D2;"                FontSize="Large"                
HorizontalOptions="FillAndExpand"                IsEnabled="{Binding CanGoForward}"                Clicked="OnGoForwardClicked" />            
</StackLayout>                         

<WebView x:Name="webView"                VerticalOptions="FillAndExpand"                 
Source="https://xamarin.com" />    
</StackLayout>
</ContentPage>

using System.Collections.Generic;
using Xamarin.Forms;
namespace DemoDataBinding
{
    public partial class DemoWebView : ContentPage
    {
        public DemoWebView()
        {
            InitializeComponent();
        }
        void OnEntryCompleted(object sender, EventArgs args)
        {
            webView.Source = ((Entry)sender).Text; 
        }
        void OnGoBackClicked(object sender, EventArgs args)
        {
            webView.GoBack(); 
        }
        void OnGoForwardClicked(object sender, EventArgs args)
        {
            webView.GoForward(); 
        }
    }
}


using System;
using System.Collections.Generic;

using Xamarin.Forms;

namespace DemoDataBinding
{
    public partial class DemoWebView : ContentPage
    {
        public DemoWebView()
        {
            InitializeComponent();
        }

        void OnEntryCompleted(object sender, EventArgs args)
        {
            webView.Source = ((Entry)sender).Text; 
        }

        void OnGoBackClicked(object sender, EventArgs args)
        {
            webView.GoBack(); 
        }

        void OnGoForwardClicked(object sender, EventArgs args)
        {
            webView.GoForward(); 
        }
    }
}

실행하면 아래와 같이 실행됩니다.


2017년 1월 24일 화요일

자마린 스튜디오 RGB Slider 컨트롤 데모 입니다.

<?xml version="1.0" encoding="UTF-8"?>
<ContentPage xmlns="http://xamarin.com/schemas/2014/forms" xmlns:x="http://schemas.microsoft.com/winfx/2009/xaml" x:Class="DemoSlider.RGBSlider">
    <ContentPage.Padding>
        <OnPlatform x:TypeArguments="Thickness"
            iOS="10, 20, 10, 10"
            Android="10, 0, 10, 10"
            WinPhone="10, 0, 10, 10" />
    </ContentPage.Padding>
 <StackLayout>
     <StackLayout.Resources>
         <ResourceDictionary>
             <Style TargetType="Slider">
                 <Setter Property="Maximum" Value="255" />
             </Style>
             <Style TargetType="Label">
                 <Setter Property="FontSize" Value="Large" />
                 <Setter Property="HorizontalTextAlignment" Value="Center" />
             </Style>
         </ResourceDictionary>
     </StackLayout.Resources>
     <Slider x:Name="redSlider"
         ValueChanged="OnSliderValueChanged" />
        <Label x:Name="redLabel" />
        <Label x:Name="greenLabel" />
        <Label x:Name="blueLabel" />

        <Slider x:Name="greenSlider"
             ValueChanged="OnSliderValueChanged" />
         <Slider x:Name="blueSlider"
             ValueChanged="OnSliderValueChanged" />
         <BoxView x:Name="boxView"
             VerticalOptions="FillAndExpand" />
     </StackLayout>        
    
</ContentPage>


using System;
using System.Collections.Generic;

using Xamarin.Forms;

namespace DemoSlider
{
    public partial class RGBSlider : ContentPage
    {
        public RGBSlider()
        {
            InitializeComponent();

            redSlider.Value = 128;
            greenSlider.Value = 128;
            blueSlider.Value = 128; 
        }

        void OnSliderValueChanged(object sender, ValueChangedEventArgs args)
        {
            if (sender == redSlider)
            {
                redLabel.Text = String.Format("Red = {0:X2}", (int)redSlider.Value);
            }
            else if (sender == greenSlider)
            {
                greenLabel.Text = String.Format("Green = {0:X2}", (int)greenSlider.Value);
            }
            else if (sender == blueSlider)
            {
                blueLabel.Text = String.Format("Blue = {0:X2}", (int)blueSlider.Value);
            }

            boxView.Color = Color.FromRgb((int)redSlider.Value,
            (int)greenSlider.Value,
           (int)blueSlider.Value);
        }
    }
}


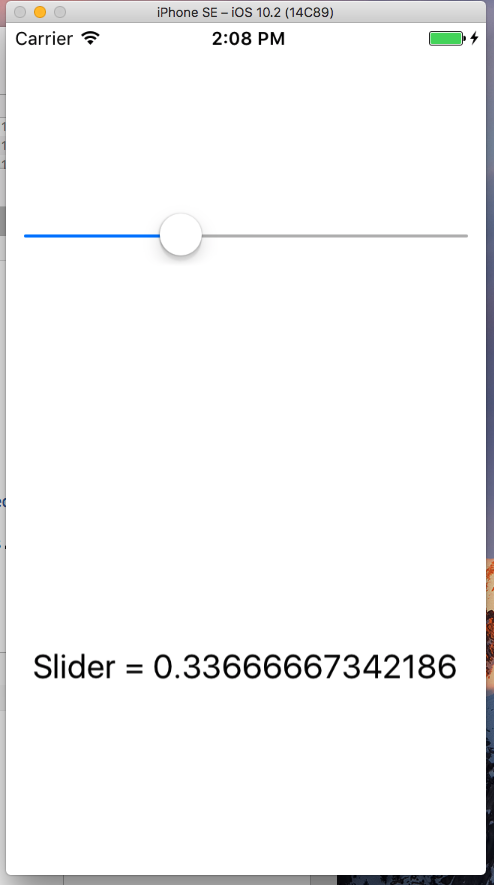
자마린 스튜디오에서 슬라이더 컨트롤 사용 데모입니다.

자마린 스튜디오에서 C#으로 작성한 코드입니다.
<?xml version="1.0" encoding="utf-8"?>
<ContentPage xmlns="http://xamarin.com/schemas/2014/forms" xmlns:x="http://schemas.microsoft.com/winfx/2009/xaml" xmlns:local="clr-namespace:DemoSlider" x:Class="DemoSlider.DemoSliderPage">

    <StackLayout Padding="10, 0">
        <Slider VerticalOptions="CenterAndExpand"
                ValueChanged="OnSliderValueChanged" />
        <Label x:Name="label"
                FontSize="Large"
                HorizontalOptions="Center"
                VerticalOptions="CenterAndExpand" /> 
    </StackLayout>
</ContentPage>


using Xamarin.Forms;

namespace DemoSlider
{
    public partial class DemoSliderPage : ContentPage
    {
        public DemoSliderPage()
        {
            InitializeComponent();
        }

        void OnSliderValueChanged(object sender, ValueChangedEventArgs args)
        {
            label.Text = string.Format("Slider = {0:}", args.NewValue); 
        }
    }
}


2017년 1월 22일 일요일

크로스 플랫폼을 지원하는 Xamarin Studio(자마린 스튜디오)를 공부하는 방법입니다.

1월에 심리적인 여유가 생겨서 자마린 스튜디오를 살펴보고 있습니다. C#으로 앱을 개발하면 아이폰앱, 안드로이드앱, 윈도우폰 또는 윈도우타블렛용 앱을 생성해 줍니다.
공부를 하려고 해도 자료가 없어서 고민을 하고 있었는데 찾아보니 자료는 넘칩니다. 다만 봐야할 양이 많아서 어떻게 하면 효율적으로 볼 수 있을지를 고민하고 있습니다.

일단 Xamarin Studio(자마린 스튜디오)가 궁금한 분들을 위한 정리된 글입니다.
http://blog.naver.com/tristein/220857822732

필요한 하드웨어로는 맥북이 있어야 합니다. 맥프레 또는 맥북에어등이 있으면 됩니다.

설치는 아래의 URL로 가서 설치하시면 됩니다. 설치는 어렵지 않은데 다만 맥과 가상 윈도우에 설치되는 파일들이 많아서 심하면 거의 하루정도를 설치에 보내게 됩니다.

https://www.xamarin.com/platform


공부 자료로는 작년말에 했던 Xamarin 16 Evolve행사가 보기에 좋습니다. 시간이 부족하면 키노트하고 몇개만 보셔도 됩니다. 


동영상 강의로는 자마린 유니버시티가 있습니다. 트라이얼로 한달을 들어볼 수 있습니다. 며칠 듣고 따라해 보았는데 잘 정리되어 있습니다. 단 유로는 999달러 입니다.ㅠㅠ
https://www.xamarin.com/university

찰스 페춀드의 자마린폼즈 책도 무료로 받을 수 있습니다. 아래 링크입니다.
https://developer.xamarin.com/guides/xamarin-forms/creating-mobile-apps-xamarin-forms/

이정도면 기존 모바일 앱을 만들어 보셨거나 C#을 사용하던 개발자들은 쉽게 헬로우 월드 앱을 만들 수 있을 겁니다. ^^

저는 맥에 Xamarin Studio를 설치했고 별도로 가상머신에 윈도우를 올려서 Visual Studio 2015 Community Editio에도 설치해서 사용하고 있습니다.

아래는 맥에서 작업하는 화면입니다.


아래는 별도로 윈도우를 올려서 비주얼스튜디오 2015 커뮤니티 에디션에서 사용하는 화면입니다.


2017년 1월 20일 금요일

맥(mac)에서 자마린 스튜디오로 만든 간단한 헬로우월드 앱입니다.

작년에 발표된 xamarin.forms로 만든 간단한 앱입니다.
언어는 C#이고 iOS 에뮬레이터로 실행한 결과입니다.

using Xamarin.Forms;

namespace Hello30
{
    public partial class App : Application
    {
        public App()
        {
            InitializeComponent();

            MainPage = new Hello30Page
            {
                Content = new StackLayout
                {
                    VerticalOptions = LayoutOptions.Center,
                    Children = {
                        new Label {
                            HorizontalTextAlignment = TextAlignment.Center,
                            Text = "자마린에 오신 것을 환영"
                        }
                    }
                }
            };
        }

        protected override void OnStart()
        {
            // Handle when your app starts
        }

        protected override void OnSleep()
        {
            // Handle when your app sleeps
        }

        protected override void OnResume()
        {
            // Handle when your app resumes
        }
    }
}


테스트 클라우드나 에저 환경과 연계해서 서버 사이드를 쉽게 만들 수 있다는 것도 강점입니다. 아무래도 과정 하나 만들어야 할 듯... 


AI 딜레마 1부 - 일자리 종말론 - PD수첩 영상입니다.

  IT분야에서 강의를 하고 있지만 개발자와 강사의 숫자가 앞으로 급격하게 줄어들 것이라는 생각을 많이 하고 있습니다. 코로나블루가 아닌 AI블루가 업계에 충격을 주고 있습니다. ㅠㅠ ​ 영상을 보다 보면 AI의 영향을 받지 않는 분야가 있을까? 하는...